Welcome to Bootcamp AI
02. Project Reviews
Access the Career Portal
How Do I Find Time for My Nanodegree?00:00
BAI Community
Introduction
What you are going to build
Prerequisites
Sign in to AWS and monitor costs
What is needed
Jobs in Cloud Computing
Cloud Computing
Test
Test
Test
Test
Test
Test
Test
Lab: Setup free-tier account
Foundational & Compute Service
Test
Test
EC2 - EBS Dashboard
Test
Test
Test
Lab - Deploy App to Beanstalk
Storage & Content Delivery
Why do we need storage in the cloud?00:00
Test
S3 – Create a Bucket
S3 & Glacier00:00
Test
Demo - S3 & Glacier00:00
DynamoDB00:00
Test
DynamoDB - Create a table00:00
Lab: DynamoDB
Relational Database Service (RDS)1:46
Test
Demo - Relational Database Service (RDS)2:29
RedShift1:26
Test
Lab - RDS
Why do we need content delivery in the cloud?00:00
Cloud Front00:00
Test
Demo - Cloud Front1:41
Lab - S3 & Cloud Front
Lesson Recap00:00
Security
Why do we need security for applications?1:07
AWS Shield00:00
Test
AWS Web Application Firewall0:50
Test
Identity & Access Management00:00
Test
Demo - Identity and Access Management (IAM)2:31
Lab IAM
Lesson Recap00:44
Networking & Elasticity
Why do we need networking in the cloud?1:54
Test
Route 5300:00
Test
Why do we need elasticity in the cloud?00:00
Test
EC2 Auto Scaling00:00
Test
EC2 - Create Auto Scaling group
EC2 - Grupo de Auto Scaling
Demo - EC2 Auto Scaling00:00
Elastic Load Balancing00:00
Test
Demo - Elastic Load Balancing00:00
EC2 - Elastic Load Balancing
EC2 - Laboratorio NLB
Lab - EC2 Auto Scaling
Lesson Recap00:00
Messaging & Containers
Why do we need messaging in the cloud?00:59
Test
Simple Notification Service (SNS)00:40
Test
Demo - Simple Notification Service (SNS)00:00
Why do we need queuing technology?00:52
Test
Simple Queue Service (SQS)00:00
Test
Demo - Simple Queue Service00:00
SQS - Create a Queue
Lab – SNS
Why do we need containers?1:16
Test
Elastic Container Service (ECS)00:00
Test
Demo: Elastic Container Service00:00
Lesson Recap00:00
AWS Management
Why do we need logging and auditing in the cloud?00:00
Cloud Trail00:00
Test
CloudTrail - Create a Trail
Demo - Cloud Trail00:00
Cloud Watch1:03
Test
Demo: Cloud Watch00:57
Lab: Cloud Watch
What is Infrastructure as Code and why do we need it?00:57
Cloud Formation00:00
Test
Demo - Cloud Formation00:00
Lab: Cloud Formation
AWS Command Line Interface (CLI)00:00
Demo - AWS Command Line Interface (CLI)00:00
Lesson Recap00:00
Course Recap00:00
Deploy Static Website on AWS
Create S3 Bucke
Upload files to S3 Bucket
Secure Bucket via IAM
Configure S3 Bucket
Configure S3 Bucket 2
Distribute Website via CloudFront
Access Website in Web Browser
Project Description - Deploy Static Website on AWS
Lista de verificación de envío de proyectos
Project Rubric - Deploy Static Website on AWS
Getting Started with CloudFormation
What is Cloud Computing?1:08
Why you need Cloud DevOps2:39
What are the benefits of Cloud DevOps?1:59
What are the benefits of Cloud DevOps? 21:47
Set up Tools 13:04
Test
Creating Access Key ID5:24
Test
Configuring AWS CLI3:52
Test
Adding Additional Keys1:40
Understanding CloudFormation2:09
Test
Getting Started With CloudFormation Script6:22
Test
Testing CloudFormation7:40
Creating a VPC: Manually vs Automated3:01
Exercise - Create a VPC: Automated7:40
Exercise - EC2 Instance with an Admin Role
Configuring AWS API User6:07
Automating with CloudFormation1:21
Test
Verifying in console00:00
Test
Conclusion1:02
Infrastructure Diagrams
Lesson Overview
Generalizing to other cloud providers1:28
Setting up Lucidcharts2:29
Test
Exercise: Setting Up Lucid Charts
Diagramming AWS Accounts and Regions2:41
Test
Exercise: Diagramming AWS accounts & regions
Diagramming Availability Zones3:28
Test
Exercise: Diagramming Availability Zones
Virtual Private Cloud5:21
Exercise: Virtual Private Cloud
Public vs Private Subnets2:34
Test
Exercise: Public vs Private Subnets
IGW Internet Gateway3:36
Test
Exercise: IGW Internet Gateway
Network Address Translation1:55
Exercise: NAT’s
Autoscaling groups4:10
Exercise: Autoscaling Groups
Load Balancers 12:47
Load Balancers 21:49
Exercise: Load Balancers2:48
Security Groups1:54
Test
Exercise: Security Groups
Routing Table2:05
Routing Table 1
Routing Table 21:50
Exercise: Routing Table
S31:50
Test
Exercise: S3
Reviewing Our Diagram1:59
Test
Summary0:46
Networking Infrastructure
Workflow and Helpers4:55
VPC and Internet Gateway 14:55
Demo: Creating subnets, part 26:54
Demo: Creating subnets, part 32:40
NAT Gateway And Subnets Part 15:51
NAT Gateway And Subnets Part 25:10
Demo - Create NAT Gateway - Part 32:16
Demo - Create NAT Gateway - Part 42:28
Demo - Verify NAT Gateway in the Web Console 54:06
Routing
Test
Demo – Route Tables Part 15:34
Demo - Associate Route Tables to Subnets Part 22:36
Demo - Verify Route Table Creation in the Web ConsolePart 34:18
Outputs4:39
Outputs ll3:35
Conclusión0:25
Challenge
Servers and Security Groups
Setting Up Our Environment2:55
Understanding Security Groups3:23
Test
Security Groups5:21
Creating Autoscaling Group00:00
Test
Launch Configuration00:00
UserData script
Debugging Launch Configuration00:00
Test
Launch Templates
Adding Target Groups and Listeners00:00
Updating the Stack with the Load Balancer00:00
Debugging Our Security Group00:00
Final Review00:00
Conclusion00:30
Connect to private servers via a Jumpbox
Challenge 3
Prerequisites
Overview
Prerequisites
Overview
Storage and Databases
Intro1:22
Test
RDS Databases (Part One)5:40
RDS Databases (Part Two)6:42
Test
RDS - Create Aurora database
RDS Database (Part Three)00:00
Test
RDS Database (Part Four)
S3 (Part One)00:00
S3 (Part Two)00:00
Test
S3 (Part Three)00:00
Test
Key Points00:00
Test
Exercise
Conclusion00:00
Monitoring & Logging
Prerrequisitos1:21
Introduction to Continuous Delivery3:02
Continuous Delivery Is Important2:17
Stakeholders2:45
True North2:45
Principles of Continuous Delivery00:00
Course Outline00:00
Tools, Environments & Dependencies0:23
Project: Give Your Application Auto-Deploy Superpowers1:19
Good Luck!00:00
Continuous Integration and Continuous Deployment---
Introduction to CI/CD1:08
Big Picture2:45
Intuition CI / CD3:02
Fundamentals of CI/CD4:10
Benefits of CI/CD4:08
Exercise: Benefits
Solution: Benefits0:58
Best Practices5:14
Continuous Integration and Continuous Deployment Strategies --
Deployment Strategies5:39
Blue Green Deployment2:12
Pipeline Building Blocks00:00
Exercise: Pipeline
Solution: Pipeline3:43
CI/CD Tools3:39
Test -
Lesson Conclusion00:00
Building a Continuous Integration Pipeline -
Introduction2:17
Big Picture00:00
Intuition00:00
Creating Pipelines00:00
Test -
Anatomy of a config.yml File00:00
Creating Jobs00:00
Exercise: Creating a Simple Workflow
Solution: Creating a Simple Workflow00:00
Environment Variables00:00
Environment Variables 2
Exercise: Environment Variables
Solution: Environment Variables00:00
Triggering00:00
Exercise: Trigger Existing Workflow
Solution: Trigger Existing Workflow2:27
Sharing Information00:00
3rd Party Secret Keepers
Exercise: Sharing Files
Solution: Sharing Files00:00
Reusable Job Code 200:00
Exercise: Reusable Job Code
Solution: Reusable Job Code2:14
Job Failures00:00
Exercise: Job Failures
Solution: Job Failures00:00
Create a CI Pipeline00:00
Exercise: Create a CI Pipeline
Solution: Create a CI Pipeline00:00
Lesson Conclusion00:00
Enabling Continuous Delivery with Deployment Pipelines
Introduccón2:43
Big Picture2:47
Intuition5:42
Configuration Management2:07
Design an Ansible Playbook 13:58
Design an Ansible Playbook 23:22
Exercise: Define Ansible Playbook
Solution: Define Ansible Playbook1:13
Build an Inventory File2:29
Exercise: Inventory File
Solution: Inventory File0:49
Remote Control Using Ansible4:20
Exercise: Remote Control Using Ansible
Solution: Remote Control Using Ansible
Solution: Remote Control Using Ansible5:51
Deployment Jobs0:54
Infrastructure Creation Jobs00:00
Exercise: Infrastructure Creation
Solution: Infrastructure Creation00:00
Configuration and Deployment Jobs00:00
Exercise: Config and Deployment
Solution: Configuration and Deployment0:40
Smoke Testing Jobs00:00
Creating a Smoke Test00:00
Exercise: Smoke Testing Jobs
Solution: Smoke Testing Jobs00:00
Rollback Jobs00:00
What Do I Need for This Job?---
Exercise: Rollback
Solution: Rollback
Production Candidate Promotion Jobs--
Exercise: Promote to Production
Solution: Promote to Production--
Lesson Conclusion --
Monitoring Environments
Introduction2:18
Big Picture1:38
Intuition About Monitoring1:53
The Case for Monitoring 13:12
The Case for Monitoring 22:53
Monitoring Tools1:28
Monitoring Tools 22:19
Set Up Prometheus 17:59
Set Up Prometheus 21:06
Exercise: Prometheus
Solution: Prometheus0:31
Exporters 10:53
Exporters 22:07
Deploy an Event-Driven Microservice
Functions as a Service (FaaS)3:24
A Model for Serverless2:53
Lesson Outline
Benefits of FaaS1:16
Test
Cloud-Native3:49
Characteristics of Cloud-Native Systems1:51
Test
AWS Account & Resources
Cloud9 Environment--7:14
Lambda Functions00:00
Test
Deploying and Testing4:33
Tutorial: Making Change
Event-Handling00:00
Events & Response00:00
Test
Create a Test
Test
Deploy & Use API Gateway---1:57
Local Requests -00:00
Creating a Virtual Environment
Test
Exercise: Wikipedia
Exercise Code
Exercise: Wikipedia--00:00
Test & Response00:00
Lesson Summary00:00
Using Docker Format Containers
Docker Containers2:00
Exercise: Setting Up a Local Environment2:49
Test
Makefiles4:17
Test
Makefile Creation Recap
Exercise: Create A Basic Makefile
Install Docker00:00
Linting and CircleCI00:00
Test
Running Dockerfiles
Setup AWS Docker Project00:00
Running Dockerfiles00:00
Exercise: Deploying to Amazon ECR00:00
Lesson Summary1:26
Test
Containerization of an Existing Application
Test
Install Packages00:53
Setup Cloud9--3:37
Copying an Application3:37
Test
App Setup0:44
Test
App Start1:10
Test
Exercise: Build and Deploy3:20
Test
Exercise: Containerize an App
Summary1:14
Container Orchestration with Kubernetes
Test
Overview of Kubernetes3:41
Test
Monitoring, Logging and Debugging with Kubernetes1:01
Exercise: Prometheus Monitoring
Exercise: Logging
Exercise: Debugging4:53
Autoscaling with CPU or Memory00:00
Test
Summary00:00
Operationalizing Microservices
Test
Disaster Recovery3:14
Test
CI/CD Pipeline Integration3:02
Test
Exercise: CircleCI
Load Testing1:11
Exercise: Locust Load Testing5:52
Summary00:00
Course Wrap Up00:00
Operationalize a Machine Learning Microservice API
Introduction1:17
Project Overview
Project Structure & Files
Create the Project Environment
Detailed Project Tasks
Project Description - Operationalize a Machine Learning Microservice API
Project Submission
Project Rubric - Operationalize a Machine Learning Microservice API
Job
Job Search Mindset1:27
Target Your Application to An Employer3:01
Open Yourself Up to Opportunity00:00
Refine Your Entry-Level Resume
Convey Your Skills Concisely1:23
Effective Resume Components00:00
Resume Structure00:00
Describe Your Work Experiences00:00
Resume Reflection00:00
Resume Review00:00
Craft Your Cover Letter
Get an Interview with a Cover Letter!00:00
Purpose of the Cover Letter00:00
Cover Letter Components00:00
Write the Introduction00:00
Write the Body00:00
Write the Conclusion00:00
Format00:00
Optimize Your GitHub Profile
Introduction00:00
GitHub profile important items00:00
Good GitHub repository00:00
Interview Part 100:00
Identify fixes for example “bad” profile00:00
Identify fixes for example “bad” profile 200:00
Quick Fixes #100:00
Quick Fixes #200:00
Writing READMEs00:00
Interview Part 200:00
Commit messages best practices
Reflect on your commit messages00:00
Participating in open source projects00:00
Interview Part 300:00
Participating in open source projects 200:00
Starring interesting repositories00:00
Develop Your Personal Brand
Why Network?2:01
Why Use Elevator Pitches?2:04
Personal Branding
Elevator Pitch1:08
Pitching to a Recruiter0:51
Why Use Elevator Pitches?1:41
-
EC2 — Launch an Instance
In this tutorial, you will learn to launch an Amazon Elastic Compute Cloud (EC2) instance. An EC2 instance is a Virtual Machine (VM) with user-defined configuration that runs on the cloud. There are a plethora of options to choose the instance-configuration of your choice. Let’s learn the general steps to build an instance with any given configuration.
A. Prerequisite
- You should have an AWS account.
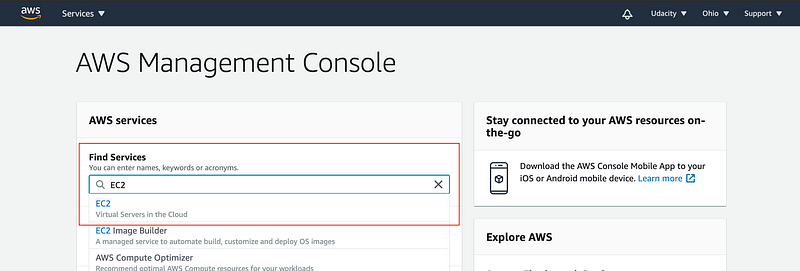
B. Go to the EC2 Dashboard
- Log in to your AWS account, and go to the AWS Management Console. Select the EC2 service.
Snapshot: AWS Management Console. You can select any AWS service from here.
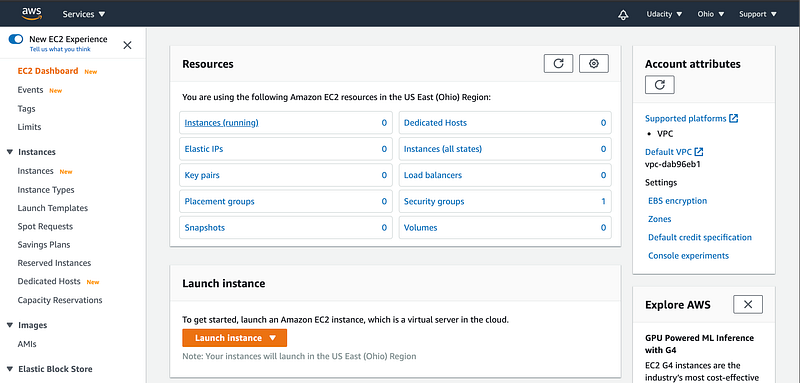
- Have a look at the EC2 Dashboard. The EC2 Dashboard is home to a variety of related services, such as Amazon Machine Images, Elastic Block Store (EBS), Load Balancer, and Auto Scaling.
Snapshot: EC2 Dashboard.
C. Start the Launch Instance Wizard
Launching an instance is an eight-step process, as described below. At any stage, you can refer to the instruction given in the official documentation for help.
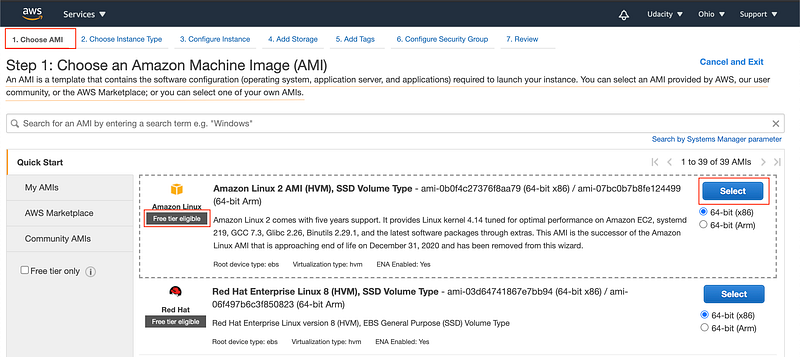
Step 1 — Choose an Amazon Machine Image (AMI)
An AMI is a template used to create a VM. AMI contains the pre-installed operating system, application server, and applications required to launch your instance. There is a variety of Linux, Windows, and other OS servers available. Choose the one available under the free-tier option.
Snapshot: Choose AMI. The Quick Start provides a list of basic AMIs.
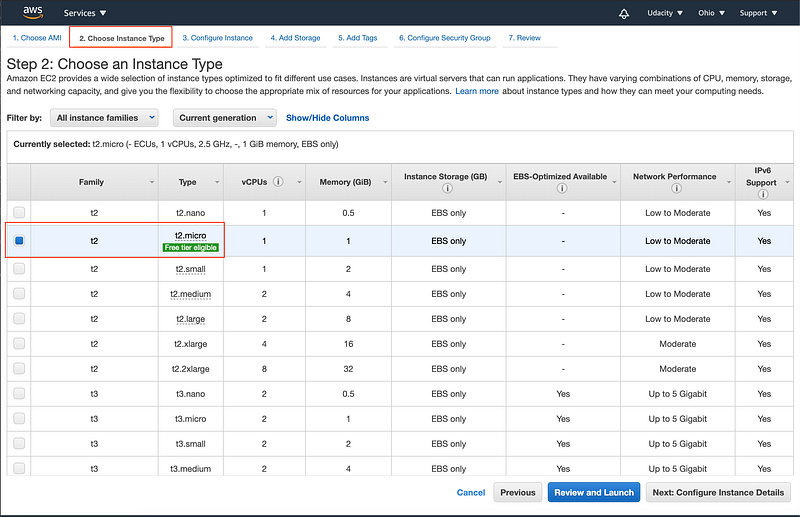
Step 2 — Choose an Instance Type
Instance Type offers varying combinations of CPUs, memory (GB), storage (GB), types of network performance, and availability of IPv6 support. AWS offers a variety of instance types, based on the configuration you choose. Prefer to choose any one of those types supported by a free tier account.
Snapshot: Choose an Instance Type.
Select the hardware configuration of your instance. The t2.micro instance type, which is available under the free tier, is selected by default. It has 1 vCPU, 2.5 GHz, 1 GiB memory, the default root volume, and supports additional EBS storage.
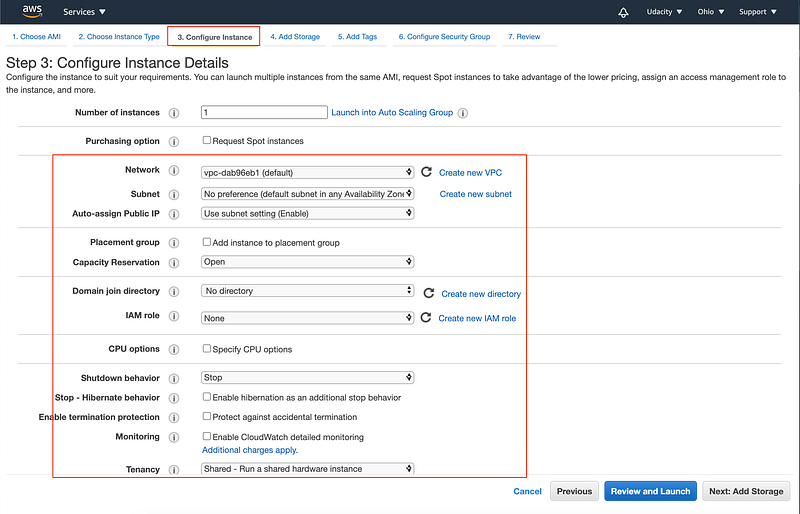
Step 3 — Configure Instance Details
Provide the instance count and configuration details, such as network, subnet, behavior, monitoring, etc.
Snapshot: Configure Instance Details. The wizard will populate the default values for all fields.
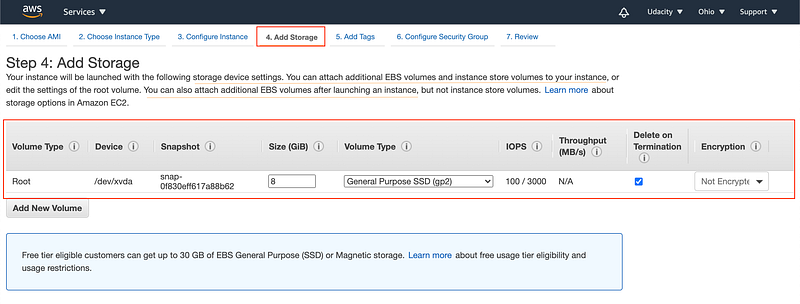
Step 4 — Add Storage
You can choose to attach either SSD or Standard Magnetic drive to your instance.
Snapshot: Add Storage. You can edit the setting of the default root volume or attach additional EBS volumes.
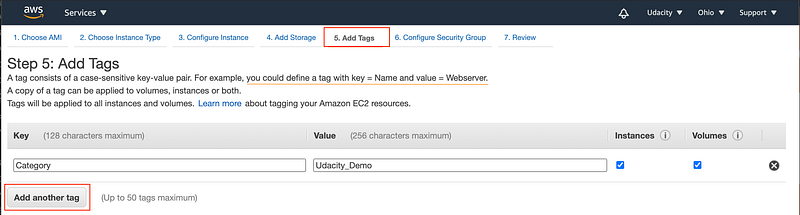
Step 5 — Add Tags
A tag serves as a label that you can attach to multiple AWS resources, such as volumes, instances, users, or roles. Tagging helps in easy search and grouping resources for various purposes.
Snapshot: Add Tags. Tags help to categorize the resources across AWS services. It works as a label.
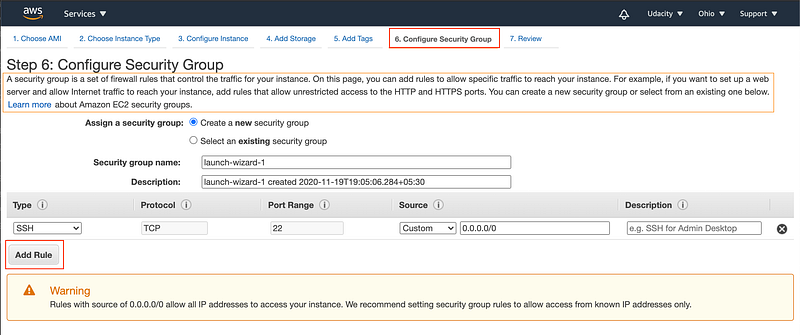
Step 6 — Configure Security Group
Attach a set of firewall rules to your instance(s) that controls the incoming traffic to your instance(s).
Snapshot: Security Groups. It defines the firewall rules, such as the protocol to open to network traffic and the set of valid IP addresses. By default, SSH protocol is used for a Linux instance, and RDP for a Windows instance. HTTP and HTTPS allow Internet traffic to reach your instance.
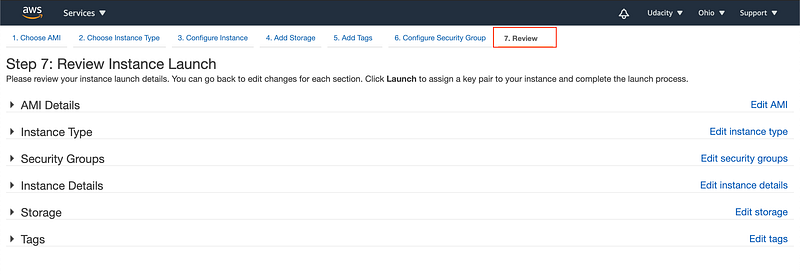
Step 7 — Review
Review your instance details before the launch.
Snapshot: Review
Step 8 — Download Key Pair
AWS generates a pair of public and private (encrypted) keys, that help in logging into the EC2 instance. Download the private key (.pem file) locally. The public key will be stored on the EC2 instance, while the private key will be available to download locally, just once. In case, if the private key file (.pem) is misplaced or lost, the AWS doesn’t allow regenerating the private key.
Snapshot: Download Private Key
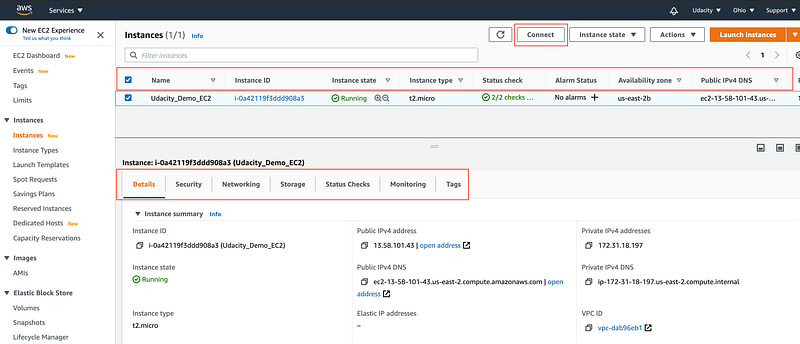
Snapshot: EC2 dashboard → Instances dashboard showing a running instance. You can select the checkbox against the instance you wish to connect/stop/terminate/view details. In this dashboard, you will see all your instances, their properties, and configuration details.
Note — Do not forget to shut down/terminate every AWS resource after use. You can instantiate them again when you’d come back.
Now, in one of your hands-on exercises next, you will have the chance to spin up your own EC2 Instance..
Recommended Read