Welcome to Bootcamp AI
02. Project Reviews
Access the Career Portal
How Do I Find Time for My Nanodegree?00:00
BAI Community
Introduction
What you are going to build
Prerequisites
Sign in to AWS and monitor costs
What is needed
Jobs in Cloud Computing
Cloud Computing
Test
Test
Test
Test
Test
Test
Test
Lab: Setup free-tier account
Foundational & Compute Service
Test
Test
EC2 - EBS Dashboard
Test
Test
Test
Lab - Deploy App to Beanstalk
Storage & Content Delivery
Why do we need storage in the cloud?00:00
Test
S3 – Create a Bucket
S3 & Glacier00:00
Test
Demo - S3 & Glacier00:00
DynamoDB00:00
Test
DynamoDB - Create a table00:00
Lab: DynamoDB
Relational Database Service (RDS)1:46
Test
Demo - Relational Database Service (RDS)2:29
RedShift1:26
Test
Lab - RDS
Why do we need content delivery in the cloud?00:00
Cloud Front00:00
Test
Demo - Cloud Front1:41
Lab - S3 & Cloud Front
Lesson Recap00:00
Security
Why do we need security for applications?1:07
AWS Shield00:00
Test
AWS Web Application Firewall0:50
Test
Identity & Access Management00:00
Test
Demo - Identity and Access Management (IAM)2:31
Lab IAM
Lesson Recap00:44
Networking & Elasticity
Why do we need networking in the cloud?1:54
Test
Route 5300:00
Test
Why do we need elasticity in the cloud?00:00
Test
EC2 Auto Scaling00:00
Test
EC2 - Create Auto Scaling group
EC2 - Grupo de Auto Scaling
Demo - EC2 Auto Scaling00:00
Elastic Load Balancing00:00
Test
Demo - Elastic Load Balancing00:00
EC2 - Elastic Load Balancing
EC2 - Laboratorio NLB
Lab - EC2 Auto Scaling
Lesson Recap00:00
Messaging & Containers
Why do we need messaging in the cloud?00:59
Test
Simple Notification Service (SNS)00:40
Test
Demo - Simple Notification Service (SNS)00:00
Why do we need queuing technology?00:52
Test
Simple Queue Service (SQS)00:00
Test
Demo - Simple Queue Service00:00
SQS - Create a Queue
Lab – SNS
Why do we need containers?1:16
Test
Elastic Container Service (ECS)00:00
Test
Demo: Elastic Container Service00:00
Lesson Recap00:00
AWS Management
Why do we need logging and auditing in the cloud?00:00
Cloud Trail00:00
Test
CloudTrail - Create a Trail
Demo - Cloud Trail00:00
Cloud Watch1:03
Test
Demo: Cloud Watch00:57
Lab: Cloud Watch
What is Infrastructure as Code and why do we need it?00:57
Cloud Formation00:00
Test
Demo - Cloud Formation00:00
Lab: Cloud Formation
AWS Command Line Interface (CLI)00:00
Demo - AWS Command Line Interface (CLI)00:00
Lesson Recap00:00
Course Recap00:00
Deploy Static Website on AWS
Create S3 Bucke
Upload files to S3 Bucket
Secure Bucket via IAM
Configure S3 Bucket
Configure S3 Bucket 2
Distribute Website via CloudFront
Access Website in Web Browser
Project Description - Deploy Static Website on AWS
Lista de verificación de envío de proyectos
Project Rubric - Deploy Static Website on AWS
Getting Started with CloudFormation
What is Cloud Computing?1:08
Why you need Cloud DevOps2:39
What are the benefits of Cloud DevOps?1:59
What are the benefits of Cloud DevOps? 21:47
Set up Tools 13:04
Test
Creating Access Key ID5:24
Test
Configuring AWS CLI3:52
Test
Adding Additional Keys1:40
Understanding CloudFormation2:09
Test
Getting Started With CloudFormation Script6:22
Test
Testing CloudFormation7:40
Creating a VPC: Manually vs Automated3:01
Exercise - Create a VPC: Automated7:40
Exercise - EC2 Instance with an Admin Role
Configuring AWS API User6:07
Automating with CloudFormation1:21
Test
Verifying in console00:00
Test
Conclusion1:02
Infrastructure Diagrams
Lesson Overview
Generalizing to other cloud providers1:28
Setting up Lucidcharts2:29
Test
Exercise: Setting Up Lucid Charts
Diagramming AWS Accounts and Regions2:41
Test
Exercise: Diagramming AWS accounts & regions
Diagramming Availability Zones3:28
Test
Exercise: Diagramming Availability Zones
Virtual Private Cloud5:21
Exercise: Virtual Private Cloud
Public vs Private Subnets2:34
Test
Exercise: Public vs Private Subnets
IGW Internet Gateway3:36
Test
Exercise: IGW Internet Gateway
Network Address Translation1:55
Exercise: NAT’s
Autoscaling groups4:10
Exercise: Autoscaling Groups
Load Balancers 12:47
Load Balancers 21:49
Exercise: Load Balancers2:48
Security Groups1:54
Test
Exercise: Security Groups
Routing Table2:05
Routing Table 1
Routing Table 21:50
Exercise: Routing Table
S31:50
Test
Exercise: S3
Reviewing Our Diagram1:59
Test
Summary0:46
Networking Infrastructure
Workflow and Helpers4:55
VPC and Internet Gateway 14:55
Demo: Creating subnets, part 26:54
Demo: Creating subnets, part 32:40
NAT Gateway And Subnets Part 15:51
NAT Gateway And Subnets Part 25:10
Demo - Create NAT Gateway - Part 32:16
Demo - Create NAT Gateway - Part 42:28
Demo - Verify NAT Gateway in the Web Console 54:06
Routing
Test
Demo – Route Tables Part 15:34
Demo - Associate Route Tables to Subnets Part 22:36
Demo - Verify Route Table Creation in the Web ConsolePart 34:18
Outputs4:39
Outputs ll3:35
Conclusión0:25
Challenge
Servers and Security Groups
Setting Up Our Environment2:55
Understanding Security Groups3:23
Test
Security Groups5:21
Creating Autoscaling Group00:00
Test
Launch Configuration00:00
UserData script
Debugging Launch Configuration00:00
Test
Launch Templates
Adding Target Groups and Listeners00:00
Updating the Stack with the Load Balancer00:00
Debugging Our Security Group00:00
Final Review00:00
Conclusion00:30
Connect to private servers via a Jumpbox
Challenge 3
Prerequisites
Overview
Prerequisites
Overview
Storage and Databases
Intro1:22
Test
RDS Databases (Part One)5:40
RDS Databases (Part Two)6:42
Test
RDS - Create Aurora database
RDS Database (Part Three)00:00
Test
RDS Database (Part Four)
S3 (Part One)00:00
S3 (Part Two)00:00
Test
S3 (Part Three)00:00
Test
Key Points00:00
Test
Exercise
Conclusion00:00
Monitoring & Logging
Prerrequisitos1:21
Introduction to Continuous Delivery3:02
Continuous Delivery Is Important2:17
Stakeholders2:45
True North2:45
Principles of Continuous Delivery00:00
Course Outline00:00
Tools, Environments & Dependencies0:23
Project: Give Your Application Auto-Deploy Superpowers1:19
Good Luck!00:00
Continuous Integration and Continuous Deployment---
Introduction to CI/CD1:08
Big Picture2:45
Intuition CI / CD3:02
Fundamentals of CI/CD4:10
Benefits of CI/CD4:08
Exercise: Benefits
Solution: Benefits0:58
Best Practices5:14
Continuous Integration and Continuous Deployment Strategies --
Deployment Strategies5:39
Blue Green Deployment2:12
Pipeline Building Blocks00:00
Exercise: Pipeline
Solution: Pipeline3:43
CI/CD Tools3:39
Test -
Lesson Conclusion00:00
Building a Continuous Integration Pipeline -
Introduction2:17
Big Picture00:00
Intuition00:00
Creating Pipelines00:00
Test -
Anatomy of a config.yml File00:00
Creating Jobs00:00
Exercise: Creating a Simple Workflow
Solution: Creating a Simple Workflow00:00
Environment Variables00:00
Environment Variables 2
Exercise: Environment Variables
Solution: Environment Variables00:00
Triggering00:00
Exercise: Trigger Existing Workflow
Solution: Trigger Existing Workflow2:27
Sharing Information00:00
3rd Party Secret Keepers
Exercise: Sharing Files
Solution: Sharing Files00:00
Reusable Job Code 200:00
Exercise: Reusable Job Code
Solution: Reusable Job Code2:14
Job Failures00:00
Exercise: Job Failures
Solution: Job Failures00:00
Create a CI Pipeline00:00
Exercise: Create a CI Pipeline
Solution: Create a CI Pipeline00:00
Lesson Conclusion00:00
Enabling Continuous Delivery with Deployment Pipelines
Introduccón2:43
Big Picture2:47
Intuition5:42
Configuration Management2:07
Design an Ansible Playbook 13:58
Design an Ansible Playbook 23:22
Exercise: Define Ansible Playbook
Solution: Define Ansible Playbook1:13
Build an Inventory File2:29
Exercise: Inventory File
Solution: Inventory File0:49
Remote Control Using Ansible4:20
Exercise: Remote Control Using Ansible
Solution: Remote Control Using Ansible
Solution: Remote Control Using Ansible5:51
Deployment Jobs0:54
Infrastructure Creation Jobs00:00
Exercise: Infrastructure Creation
Solution: Infrastructure Creation00:00
Configuration and Deployment Jobs00:00
Exercise: Config and Deployment
Solution: Configuration and Deployment0:40
Smoke Testing Jobs00:00
Creating a Smoke Test00:00
Exercise: Smoke Testing Jobs
Solution: Smoke Testing Jobs00:00
Rollback Jobs00:00
What Do I Need for This Job?---
Exercise: Rollback
Solution: Rollback
Production Candidate Promotion Jobs--
Exercise: Promote to Production
Solution: Promote to Production--
Lesson Conclusion --
Monitoring Environments
Introduction2:18
Big Picture1:38
Intuition About Monitoring1:53
The Case for Monitoring 13:12
The Case for Monitoring 22:53
Monitoring Tools1:28
Monitoring Tools 22:19
Set Up Prometheus 17:59
Set Up Prometheus 21:06
Exercise: Prometheus
Solution: Prometheus0:31
Exporters 10:53
Exporters 22:07
Deploy an Event-Driven Microservice
Functions as a Service (FaaS)3:24
A Model for Serverless2:53
Lesson Outline
Benefits of FaaS1:16
Test
Cloud-Native3:49
Characteristics of Cloud-Native Systems1:51
Test
AWS Account & Resources
Cloud9 Environment--7:14
Lambda Functions00:00
Test
Deploying and Testing4:33
Tutorial: Making Change
Event-Handling00:00
Events & Response00:00
Test
Create a Test
Test
Deploy & Use API Gateway---1:57
Local Requests -00:00
Creating a Virtual Environment
Test
Exercise: Wikipedia
Exercise Code
Exercise: Wikipedia--00:00
Test & Response00:00
Lesson Summary00:00
Using Docker Format Containers
Docker Containers2:00
Exercise: Setting Up a Local Environment2:49
Test
Makefiles4:17
Test
Makefile Creation Recap
Exercise: Create A Basic Makefile
Install Docker00:00
Linting and CircleCI00:00
Test
Running Dockerfiles
Setup AWS Docker Project00:00
Running Dockerfiles00:00
Exercise: Deploying to Amazon ECR00:00
Lesson Summary1:26
Test
Containerization of an Existing Application
Test
Install Packages00:53
Setup Cloud9--3:37
Copying an Application3:37
Test
App Setup0:44
Test
App Start1:10
Test
Exercise: Build and Deploy3:20
Test
Exercise: Containerize an App
Summary1:14
Container Orchestration with Kubernetes
Test
Overview of Kubernetes3:41
Test
Monitoring, Logging and Debugging with Kubernetes1:01
Exercise: Prometheus Monitoring
Exercise: Logging
Exercise: Debugging4:53
Autoscaling with CPU or Memory00:00
Test
Summary00:00
Operationalizing Microservices
Test
Disaster Recovery3:14
Test
CI/CD Pipeline Integration3:02
Test
Exercise: CircleCI
Load Testing1:11
Exercise: Locust Load Testing5:52
Summary00:00
Course Wrap Up00:00
Operationalize a Machine Learning Microservice API
Introduction1:17
Project Overview
Project Structure & Files
Create the Project Environment
Detailed Project Tasks
Project Description - Operationalize a Machine Learning Microservice API
Project Submission
Project Rubric - Operationalize a Machine Learning Microservice API
Job
Job Search Mindset1:27
Target Your Application to An Employer3:01
Open Yourself Up to Opportunity00:00
Refine Your Entry-Level Resume
Convey Your Skills Concisely1:23
Effective Resume Components00:00
Resume Structure00:00
Describe Your Work Experiences00:00
Resume Reflection00:00
Resume Review00:00
Craft Your Cover Letter
Get an Interview with a Cover Letter!00:00
Purpose of the Cover Letter00:00
Cover Letter Components00:00
Write the Introduction00:00
Write the Body00:00
Write the Conclusion00:00
Format00:00
Optimize Your GitHub Profile
Introduction00:00
GitHub profile important items00:00
Good GitHub repository00:00
Interview Part 100:00
Identify fixes for example “bad” profile00:00
Identify fixes for example “bad” profile 200:00
Quick Fixes #100:00
Quick Fixes #200:00
Writing READMEs00:00
Interview Part 200:00
Commit messages best practices
Reflect on your commit messages00:00
Participating in open source projects00:00
Interview Part 300:00
Participating in open source projects 200:00
Starring interesting repositories00:00
Develop Your Personal Brand
Why Network?2:01
Why Use Elevator Pitches?2:04
Personal Branding
Elevator Pitch1:08
Pitching to a Recruiter0:51
Why Use Elevator Pitches?1:41
Compute Power in the Cloud
In this hands-on exercise, you will write your first Lambda function using Node.js.
- Prerequisites:
- AWS account
- An Amazon S3 bucket is required for this trigger to work
- By the end of this lab, you will be able to:
- Author a Lambda function using Node.js via the console
- Test a Lambda function via the console
Follow the exercise instructions given below:
Step 0. Prerequisite: Create an S3 bucket
AWS S3 is a file storage service. Though, we will learn S3 in detail in the upcoming lesson, let’s create an S3 bucket (folder) for this exercise.
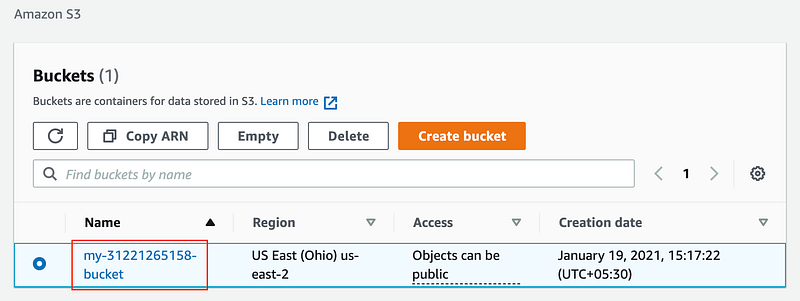
- Go to the S3 dashboard, and click on the Create bucket.
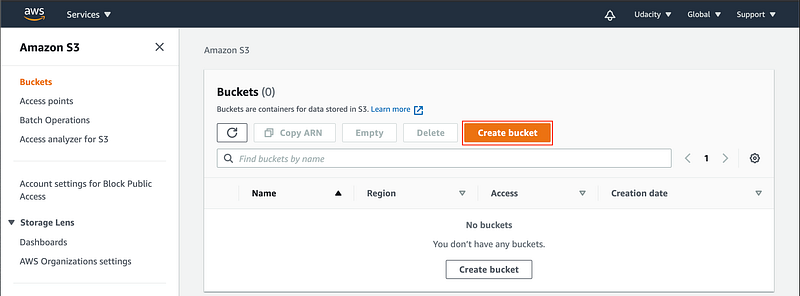
Snapshot: S3 → Buckets dashboard. View all of the S3 buckets in your account.
- Enter the bucket name, and make it visible to the public. The name should be unique worldwide, you can use the convention as my-<aws account id>-bucket. Leave other fields as default, and create the bucket.
Give a unique name to your bucket
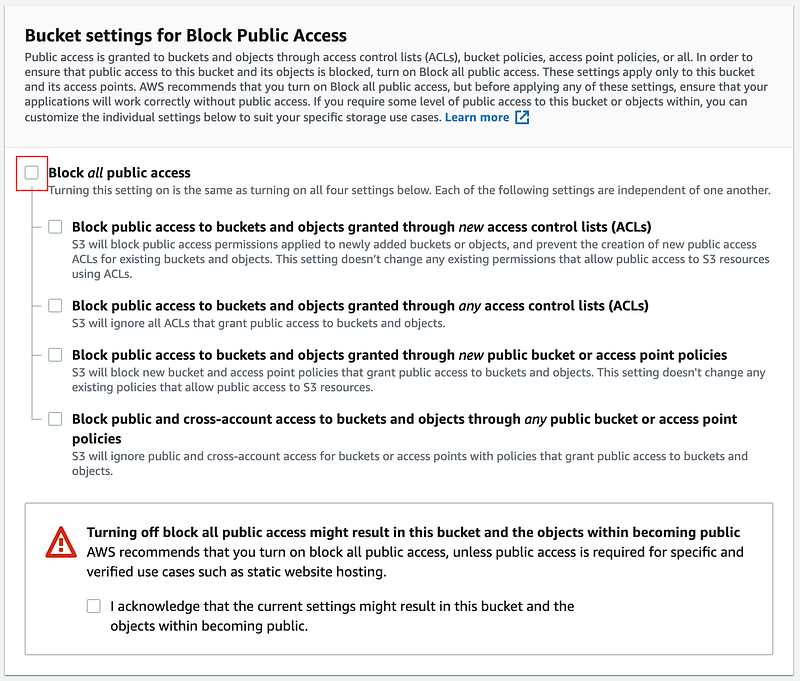
Make the bucket publicly accessible
Step 1. Create a Lambda Function
- From the AWS Management Console page, select the Lambda service.
- Use the Create function wizard, and select the Author from scratch option.
- Use the following basic information to create a function:
Field
Value
Function name
Your choice
Runtime
Node.js 12.x
Permissions
Use default
By default, Lambda will create an execution role with permissions to upload logs to Amazon CloudWatch Logs.
Step 2: Add a Trigger
Next, the wizard will automatically display the details of the newly created function. Add a trigger under the Designer section .
- Click Add Trigger
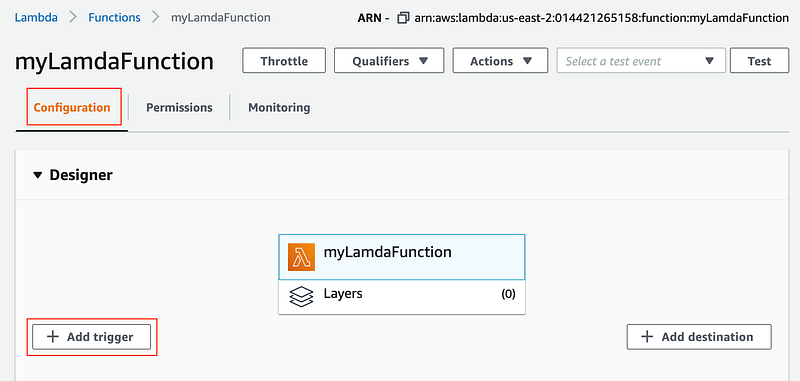
The Designer section
- On the Add Trigger screen, select “S3” as the trigger
- Select the S3 bucket name for the Bucket
- For Event Type, select “All object create events”.
This means that anytime a file is created (or uploaded) to the selected S3 bucket, the lambda function will be triggered . - Acknowledge the Recursive invocation message
- Click the Add button . Congratulations, you’ve added a trigger!
In the Designer section, click on the name of the Lambda to have the Function Code section reappear
Step 3. Configure Test event
Next, the wizard will automatically display the details of the newly created function.
- Click on the Test button on the upper right-hand corner, to configure test event(s).
- Ensure the Event template is Hello World.
- For the Event name enter TestEvent.
Update the JSON to the statement below, replacing the string value with your name.
{
“key1”: “Place your name here”
}
Step 4. Modify a Lambda Function
Go to the Function code section, where you can view the following default JS code:
exports.handler = async (event) => {
// TODO implement
const response = {
statusCode: 200,
body: JSON.stringify(‘Hello from Lambda!’),
};
return response;
};
Replace the code on Line 5 with the statement below, and save your code:
body: JSON.stringify(‘Hello ‘ + event.key1 + ‘ from Lambda!’),
- Deploy your saved function by clicking on the Deploy button at the top-right of the current section.
- Edit the Basic Settings section, and save the following values:
Field
Value
Description
Udacity Function
Timeout
10 minutes
- Make sure the Execution role filed uses an existing role.
Step 5. Test a Lambda Function
- Click the Test button in the upper right-hand corner again to test your function.
- The output will be displayed in the Execution results section at the top. Expand the Details to review the output.
Congratulations on writing your first Lambda function!
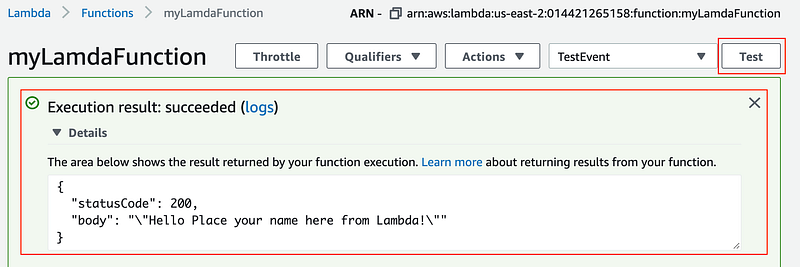
Test output
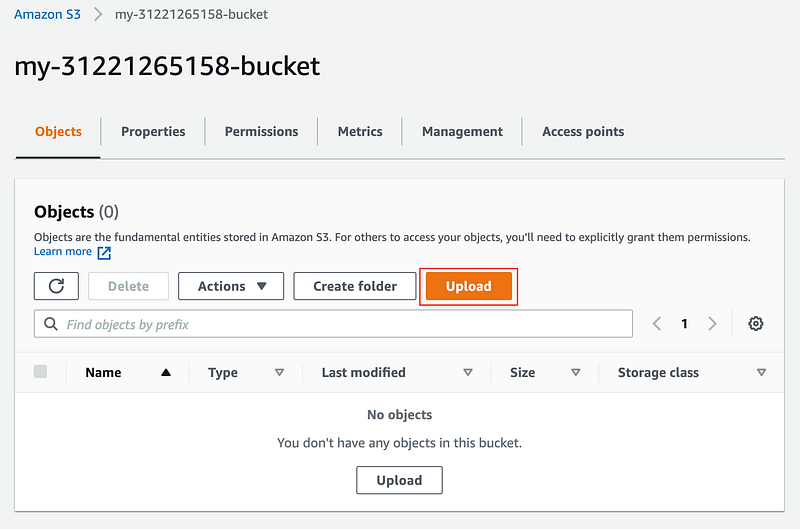
Step 6. Add files to the bucket
- From the S3 dashboard, click on the name of the bucket you have created in the first step above.
Click on the bucket name to view its content
- Upload a few files to the bucket, from your local computer.
Start the Upload wizard
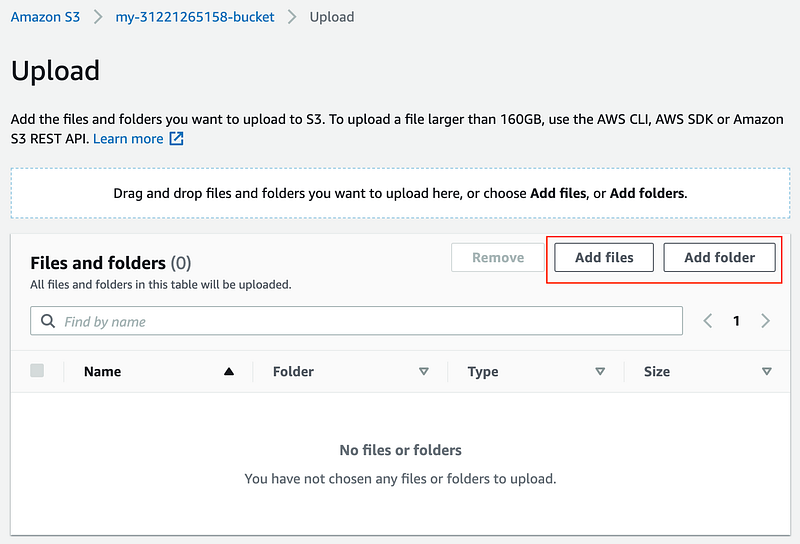
Add multiple files and folders, and finally, click on the Upload button below
Step 7. Check if the Lambda function is triggered
- Go back to the Lambda console, and select your function to view its details.
- Click on the Monitoring tab to view the metrics that show the number of times the Lambda function is triggered as a response to file(s) upload in the S3 bucket.
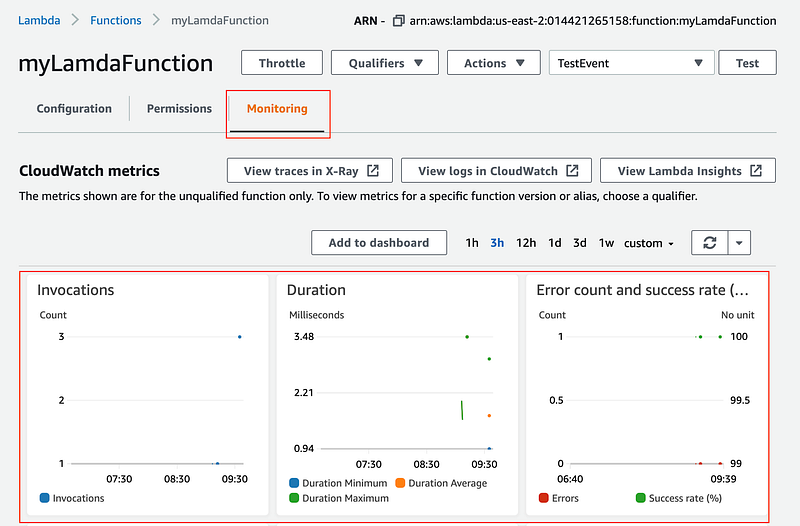
View the Monitoring tab in the Lambda console
- You can view the detailed Invocations chart in the CloudWatch console.

View the metrics in the CloudWatch console
- The detailed graph in the CloudWatch console shows that the Lambda function was triggered thrice. See the snapshot below.
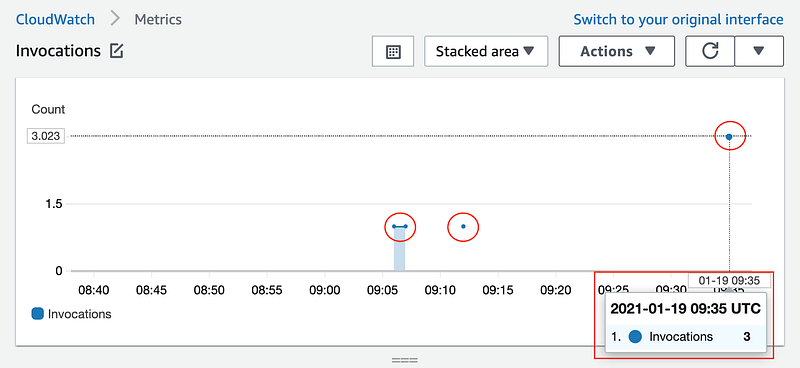
CloudWatch metrics showing the number of invocations of the Lambda function. Recall that anytime a file is created (or uploaded) to the selected S3 bucket, the lambda will be triggered .
Step 8. Delete resources
- Do not forget to delete the Lambda function, and the S3 bucket after the exercise is over.
- To delete the Lambda function, go back to the Lambda console, select the checkbox against the function name, and choose the delete action.
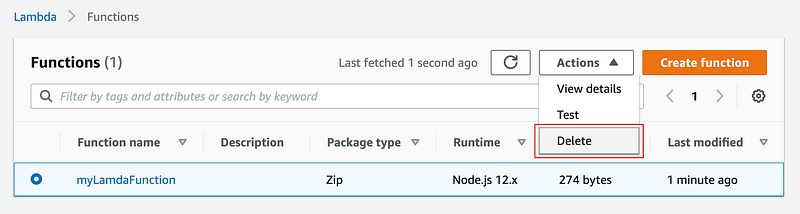
Delete a Lambda function
- To delete the S3 bucket, go back t
- o the S3 console, select the bucket checkbox against the bucket name, and empty and then delete the bucket.
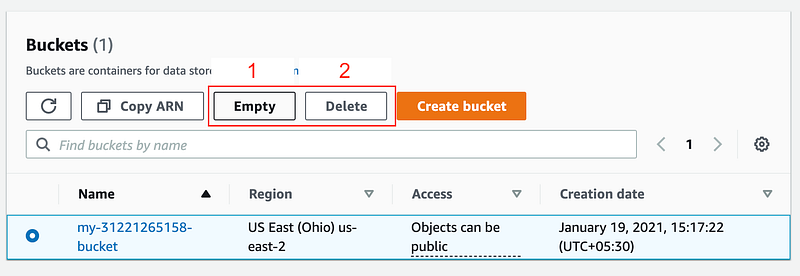
Once the exercise is over, empty and delete the bucket
# Compute Power in the Cloud
In this hands-on exercise, you will write your first Lambda function using Node.js.
Prerequisites:
- AWS account
Topics Covered:
By the end of this lab, you will be able to:
- Author a Lambda function using Node.js via the console
- Test a Lambda function via the console
Steps:
- Create a Lambda Function
- On the AWS Management Console page, type
lambdain theFind Servicesbox and then selectLambda. - Click the “Create function” button and select
Author from scratch. - Enter a
Function nameand selectNode.js 8.10as the runtime. - For
Permission, clickChoose or create an execution role, and selectCreate a new role with basic Lambda permissions. - Click
Create function.
- On the AWS Management Console page, type
- Modify a Lambda Function
- Scroll down to the code for the Lambda function.
- Replace the code on Line 5 with the statement below:
body: JSON.stringify('Hello ' + event.key1 + ' from Lambda!'),* Click the `Save` button in the upper right-hand corner.
* Scroll down to the `Basic Settings` section.
* For the Description, enter `Udacity Function`.
* Change the `Timeout` from 3 seconds to 10 minutes.
* Click the `Save`button in the upper right-hand corner.- Test a Lambda Function
- Click on the
Testbutton in the upper right-hand corner. - Ensure the
Event templateisHello World. - For the
Event nameenterTestEvent
Important: The name cannot contain spaces. - Update the JSON to the statement below, replacing the statement with your name.
- Click on the
{
  "key1": "Place your name here"
}- Click
Create. - Click the
Testbutton in the upper right-hand corner again. - Scroll up to see the output in the
Execution Resultspane. - Review your results in the window.
Congratulations on writing your first Lambda function!