Welcome
Playground access
Access the Career Portal
How Do I Find Time for My Nanodegree?00:00
Career support
Send your projects
What is a Robot
Career Support Overview
01. Careers in Robotics1:33
02. Design Review1:40
Get Help from Peers and Mentors
02. Reviews
Explores - Biologically Inspired Robots
01. Welcome1:26
02. Meet Arpan Chakraborty
03. Actuation12:38
04. Vision9:18
05. Control9:33
06. READ Research Papers
07. Biologically Inspired Approaches
08. Robotic Insect
09. Cheetah Locomotion
10. OpenRatSLAM
11. WATCH Concepts in Action
12. DO Lab
13. Lab Configuration
14. Lab Challenge
Questions on Robotics Careers
01. 6 Questions on Robotics Careers
02. Setting Goals
Fundamentals of robot movement
Fundamentals of robot movement.00:00
Part 1. Degrees of Freedom of a Rigid Body00:00
Part 2. Degrees of Freedom of a Robot00:00
Configuration space topology00:00
Configuration Space Representation00:00
Configuration and Velocity Constraints00:00
Task Space and Workspace00:00
Introduction to rigid body motion
Introduction to rigid body motion00:00
Rotation Matrices (Part 1 of 2)00:00
Rotation Matrices (Part 2 of 2)00:00
Rotation quiz
Rotation Matrices Practice
Angular Velocities00:00
Exponential Rotation Coordinates (Part 1 of 2)00:00
Exponential Coordinates of Rotation (Part 2 of 2)00:00
Homogeneous Transformation Matrices00:00
Twists (Part 1 of 2)00:00
Twists (Part 2 of 2)00:00
Exponential Coordinates of Rigid-Body Motion00:00
Wrenches00:00
Formula for the product of exponentials in the spatial frame00:00
Product of Exponentials Formula in the End-Effector Frame00:00
Search and Sample Return
02. Explore the Simulator1:50
03. Telemetry and Record Data1:16
04. Jupyter Notebook3:16
05. Workspace Playground
06. The Perception Step
07. Perspective Transform3:40
08. Warp, Threshold, Map
09. Map to World Coordinates
10. Decision Where to Go
11. Test Your Methods
12. Online Rover Lab
13. Environment Setup (Local)
14. More Decisions
15. Take Action!
16. Autonomous Mode
17. Requirements Challenges
18. Common Questions
Project Description - Search and Sample Return42:25
Assigments
Robotic arms and forward kinematics
Introduction to Robot Manipulator Arms1:32
Types of robots4:51
Quiz Types of robots
Analyzing a very simple 1-joint robot arm5:24
Quiz 1-joint robot arm
Analyzing a 2-joint planar robot arm6:05
Quiz 2-joint planar robot arm
Analyzing a 3-joint planar robot arm00:00
Quiz 3-joint planar robot arm
Analyzing a robot arm that moves in 3D5:57
Quiz robot arm that moves in 3D
Analyzing a general-purpose robot arm that moves in 3D0:37
Quiz general-purpose robot arm that moves in 3D
Task and Configuration space10:16
Quiz Task and Configuration space
Denavit-Hartenberg notation4:51
Quiz Denavit-Hartenberg notation
Base and tool transforms00:00
Quiz Base and tool transforms
Robot workspace0:56
Quiz Robot workspace
Intro to Kinematics
01. Overview1:14
02. Intro to Kinematics2:36
03. Degrees of Freedom
03. Degrees of Freedom
03.2 Degrees of Freedom
03.2 Degrees of Freedom
03.3 Degrees of Freedom
03.3 Degrees of Freedom
03.4 Degrees of Freedom
03.4 Degrees of Freedom
03.5 Degrees of Freedom
03.5 Degrees of Freedom
04. Two DoF Arm Practice
04. Two DoF Arm
04. Two DoF Arm
04.2 Two DoF Arm
04.2 Two DoF Arm
04.3 Two DoF Arm
05. Generalized Coordinates
06. Rigid Bodies in Free Space
06. Rigid Bodies in Free Space
06.2 Rigid Bodies in Free Space
06.2 Rigid Bodies in Free Space
06.3 Rigid Bodies in Free Space
06.3 Rigid Bodies in Free Space
06.4 Rigid Bodies in Free Space
07. Joint Types
07. Joint Types
08. Principal Types of Serial Manipulators2:02
08. Principal Types of Serial Manipulators
09. Serial Manipulator Applications
10. Quiz: Reachable Workspace
10. Quiz: Reachable Workspace
Inverse Kinematics and Robot Motion
Introduction to inverse kinematics1:04
Inverse Kinematics for a 2-Joint Robot Arm Using Geometry5:25
Quiz inverse kineamitcs
Inverse Kinematics for a 2-Joint Robot Arm Using Algebra3:04
Quiz inverse kinamtics
Inverse Tangent Function3:15
Quiz Inverse Tangent Function
Inverse Kinematics for a General Purpose Robot Arm That Moves in 3D6:35
Quiz Inverse Kinematics
Robot Arm Configuration Change4:47
Quiz Robot Arm Configuration Change
Different Approach to Solving Inverse Kinematics5:52
Quiz Different Approach to Solving Inverse Kinematics
Numerical Inverse Kinematics8:14
Quiz Numerical Inverse Kinematics
Reachability and Singularity00:00
Quiz Reachability and Singularity
Redundant Robots00:00
Quiz Redundant Robots
Joint Interpolated Motion00:00
Quiz Joint Interpolated Motion
Cartesian Interpolated Motion5:06
Quiz Cartesian Interpolated Motion
Summary of Inverse Kinematics00:00
Forward and Inverse Kinematics
01. Setting up the Problem0:53
02. Coordinate Frames and Vectors2:47
03. Rotation Matrices in 2D0:39
03.2 Rotation Matrices in 2D
04. Rotation Matrices in 3D4:30
05. Quiz Build a Rotation Matrix
05. Quiz: Build a Rotation Matrix
05.2 Quiz Build a Rotation Matrix
05.2 Quiz Build a Rotation Matrix
05.3 Quiz Build a Rotation Matrix
05.3 Quiz Build a Rotation Matrix
06. Rotations in Sympy
07. Composition of Rotations4:48
07.2 Composition of Rotations Practice
07.2 Composition of Rotations Solution
07.3 Composition of Rotations Practice
07.3 Composition of Rotations Solution
07. Composition of Rotations
08. Euler Angles from a Rotation Matrix
08. Practice: Euler Angles from a Rotation Matrix
08. Solution: Euler Angles from a Rotation Matrix
09. Translations
10. Homogeneous Transforms and their Inverse
11. Composition of Homogeneous Transforms
11. Practice. Composition of Homogeneous Transforms
11. Solution. Composition of Homogeneous Transforms
12. Denavit-Hartenberg Parameters
13. DH Parameter Assignment Algorithm
14. DH Steps 1-44:48
15. DH Steps 5-83:42
16. DH Parameter Table4:03
17. Forward Kinematics
17. Forward Kinematics
18. Inverse Kinematics
19. Inverse Kinematics Example
20. Wrap Up0:47
Set up your work environment
1. Setting up your online environment
2. Setting up your local environment39:48
Project: Robotic Arm: Pick & Place
01. Overview39:48
02. Setting up your local environment on Linux
03. Introduction to Project Tools
04. Gazebo Basics
05. Exploring Gazebo User Interface3:50
06. Understanding Unified Robot Description Format (URDF)
07. RViz Basics
08. Moveit! Basics4:25
09. Pick and Place Demo Walkthrough2:38
10. KR210 Forward Kinematics 13:10
11. KR210 Forward Kinematics 24:01
12. KR210 Forward Kinematics 32:16
13. Forward Kinematics with Kuka KR210
14. Debugging Forward Kinematics
15. Inverse Kinematics with Kuka KR210
16. Creating IK Solver for Kuka KR210
17. Debugging Inverse Kinematics and Optimization
18. Requirements and Challenge14:41
19. Common Questions
20. Project Guide3:06
20.2 Project Guide5:33
20.3 Project Guide3:51
Project Description - Robotic Arm: Pick & Place14:41
Project Rubric - Robotic Arm: Pick & Place
Submitting Your Project
Explores - Human Robot Interaction Robot Ethics
01. Introduction0:51
02. READ Research Papers
03. Uncanny Valley
04. Designing Robot Heads
05. Human Trajectory Prediction in Crowded Spaces
06. Robot Ethics
07. Robot Ethics from Philosophy of Science
08. WATCH Concepts in Action
09. Meet Andra Keay
10. Exclusive Silicon Valley Robotics00:00
11. Meet Cory Kidd
12. Exclusive Catalia Health00:00
13. Meet Kaijen Hsiao
14. Exclusive Mayfield Robotics00:00
15. DO Lab - Build a Robot Prototype Under $25
Product Pitch
01. Pitching Your Robot Prototype
02. Anatomy of a Product Pitch
03. Showcasing Your Work
Perception Overview
01. Perception and Robotics1:47
02. The Upcoming Project1:01
03. Classic vs Modern Approach
04. Summary0:44
Introduction to 3D Perception
01. 3D Perception0:56
02. Active Sensors
03. Passive Sensors
04. RGB D Cameras
05. Sensor Quiz
06. Why RGB D0:59
07. RGB Image Formation2:31
08. Adding Depth
09. What is a Point Cloud
10. Point Cloud Types
11. Creating a Point Cloud from RGB D Data
12. 3D Perception Summary0:22
Calibration, Filtering, and Segmentation
01. Intro to Calibration, Filtering, and Segmentation1:03
02. Sensor Calibration1:25
03. RGB Camera Model2:46
04. Calibration Pattern
05. OpenCV Calibration
06. Extrinsic Calibration
07. RGBD Calibration in ROS
08. Point Cloud Filtering1:20
09. Table top Segmentation Exercise
10. Voxel Grid Downsampling
10. Quiz
11. Pass Through Filtering
11. Quiz
12. Segmentation in Perception0:53
13. RANSAC Overview
14. RANSAC Plane Fitting
14. Quiz
15. Extracting Indices
16. Outlier Removal Filter
17. Summary0:26
Clustering for Segmentation
01. Object Segmentation0:50
02. Downside of Model Fitting1:16
03. Clustering1:55
04. K means Clustering2:55
05. K means Playground
06. K means quizzes
06. K means quizzes
07. DBSCAN Algorithm
07. DBSCAN Algorithm (Practice)
08. Comparing DBSCAN and k-means Clustering
09. Clustering with PCL
10. Publish Your Point Cloud
11. Filtering and RANSAC
12. Clustering Objects
13. Cluster Visualization
14. Segmentation Summary0:59
Object Recognition
01. Intro to Object Recognition1:28
02. Features1:08
03. Feature Intuition
03. Feature Intuition
04. Color Spaces2:31
05. HSV Intuitions
05. HSV Intuitions
06. Color Histograms1:00
07. Histogram in Action
07. Histogram in Action (Practice)
08. Surface Normals1:28
09. Normals Intuition
09. Normals Intuition
10. Support Vector Machine
10. Support Vector Machine (Practice)
11. SVM Intuitions
11. SVM Intuitions
12. SVM Image Classification (Practice)
13. Recognition Exercise
14. Generate Features
15. Train Your SVM
15. Train Your SVM
16. Improve Your Model
16. Improve Your Model
17. Object Recognition
18. Recognition Wrap up0:40
19. Common Questions
3D Perception Project
01. Project Intro0:38
02. Amazon Robotics Challenge
03. Environment Setup
04. Project Demo
05. Perception Pipeline
06. Output yaml files
07. Requirements and Challenge
08. PR2 Collision Avoidance
08. PR2 Collision Avoidance
09. Robot Motion
10. Common Questions
11. Project Summary0:54
Project Rubric - 3D Perception
Project Description - 3D Perception
Submitting Your Project
Explores - Soft Robotics
01. Introduction0:49
03. READ Research Papers
04. Soft Robotics A Perspective
05. Untethered Soft Robot
06. Design and Fabrication
07. Combining Hard and Soft Robots
08. Self Folding Robots
09. Oribotics
10. WATCH Concepts in Action
11. Meet Josh Lessing
12. Exclusive Getting Started in Robotics3:39
13. Exclusive What is Soft Robotics5:53
14. Exclusive What Does Soft Robots Inc. Do00:00
15. Exclusive Our Process00:00
16. Exclusive Soft Robots and Food00:00
17. Exclusive The Future of Soft Robots00:00
18. Exclusive Getting Started in Soft Robotics00:00
19. Meet Rajat Mishra
20. Exclusive Rajat Mishra00:00
21. DO Lab Make an Earthworm00:00
22. DO Lab Metamaterials00:00
Explores - Robot Grasping
01. Introduction1:00
02. READ Research Papers
03. An Overview of Grasping
04. Jamming based Gripper
05. Dex Net 2.0
06. Learning Hand Eye Grasping
07. Slip Detection and Correction
08. WATCH Concepts in Action
09. Meet Josh Lessing
10. Exclusive What is Soft Robotics00:00
11. Exclusive Our Process6:21
12. Exclusive Soft Robots and Food00:00
13. DO Challenge Build a Gripper00:00
14. DO Lab Dex Net 2.0 Code
Introduction to Controls
01. Overview of Controls Engineering1:42
02. Open Loop Control1:44
03. Closed Loop Control4:14
04. PID Overview2:39
05. Getting to Know Your Simulator
06. Proportional Control 1
07. Proportional Control 2
08. Proportional Control 3
08. Proportional Control 3
09. Building a P Controller
10. PI Control
11. Building a PI Controller
12. PD Control
13. Building a PD Controller
14. Building a PID Controller
15. PID Control Summary1:14
16. Limitations of PID1:22
17. Beyond the Ideal Case Integrator Windup
18. Beyond the Ideal Case Noise1:50
19. Control Design Objective and Criteria
20. Tuning Strategies 1
21. Tuning Strategies 2
22. Putting It All Together
23. Wrap Up00:00
Quadrotor Control using PID
01. Introduction to a Positional Controller0:54
02. Quadrotor Kinematic and Dynamic Model 1
03. Quadrotor Quiz
04. Quadrotor Kinematic and Dynamic Model 2
05. Cascade PID Control
06. Lab Walkthrough
07. Environment Setup
08. Exploring the Sim
09. Helpful Tools
10. Completing PID Controller
11. Hover Controller
12. dynamic_reconfigure
13. Attitude Controller
14. Positional Controller
15. Lab Summary
16. PID Wrap Up0:49
Explores Swarm Robotics
01. Introduction1:14
02. READ Research Papers
03. Swarm Robots in Medicine
04. Kilobots
05. Search and Rescue
06. Self Assembly Swarm Robots
07. WATCH Concepts in Action
08. Meet Sabine Hauert
09. Exclusive Sabine Hauert41:05
10. DO Lab Create a Swarm
Networking in Robotics
01. Skills Recap
02. Companies to Know
03. Networking Next Steps
Intro to Neural Networks
01. Introducing1:56
02. Intro to Neural Networks1:53
03. Classification Problems 11:38
04. Classification Problems 21:04
05. Linear Boundaries2:43
06. Perceptrons3:55
06. Perceptrons
07. Why Neural Networks0:46
08. Perceptrons as Logical Operators2:06
08.2 Perceptrons as Logical Operators
08.2 Perceptrons as Logical Operators
08.3 Perceptrons as Logical Operators0:22
09. Perceptron Trick1:38
09. Perceptron Trick
09.2 Perceptron Trick0:13
09.3 Perceptron Trick2:59
10. Perceptron Algorithm2:14
11. Higher Dimensions2:01
11. Higher Dimensions
12. Error Functions0:33
13. Log loss Error Function5:51
13. Log-loss Error Function
14. Discrete vs Continuous0:19
14.2 Discrete vs Continuous3:58
14.2 Discrete vs Continuous
15. Softmax0:17
15.2 Softmax V23:28
15.2 Question
15.3 Softmax1:39
16. One Hot Encoding1:20
17. Maximum Likelihood1:03
17.2 Maximum Likelihood3:08
17.2 Maximum Likelihood
18. Maximizing Probabilities0:34
18.1 Quiz Cross Entropy1:34
18.2 Maximizing Probabilities
19. Cross Entropy 13:17
20. Cross Entropy 20:22
20.1 CrossEntropy Formula5:37
21. Multi Class Cross Entropy3:11
21. Multi-Class Cross Entropy
22. Logistic Regression1:08
22.1 Logistic Regression-Minimizing The Error Function3:45
23. Gradient Descent2:51
24. Logistic Regression Algorithm
25. Non Linear Regions1:00
26. Non Linear Models0:52
27. Neural Network Architecture2:09
27.2 Neural Network Architecture3:47
27.2 Quiz
27.3 Multiple layers00:00
27.3 Neural Network Architecture2:09
27.4 Multi-Class Classification00:00
27.4 Neural Network Architecture1:20
Question
28. Feedforward4:20
28.2 Error Function1:20
29. Backpropagation5:13
29.2 Backpropagation V22:20
29.3 Chain Rule1:14
29.4 Calculating The Gradient4:38
30. Further Reading
31. Neural Networks Wrap Up0:55
TensorFlow for Deep Learning
01. Introducing0:44
02. What is Deep Learning0:53
03. Solving Problems Big and Small1:29
04. Let's Get Started!0:49
05. Installing Tensorflow
06. Hello, Tensor World!
07. Transition to Classification
08. Classification0:48
09. Let's make a deal0:37
10. Training Your Logistic Classifier1:46
11. Tensorflow Softmax
11. Tensorflow Softmax
12. TensorFlow Cross Entropy1:35
13. Minimizing Cross Entropy1:54
14. Practical Aspects of Learning0:27
15. Quiz Numerical Stability0:30
16. Normalized Inputs and Initial Weights2:47
17. Measuring Performance3:28
18. Validation and Test Set Size0:41
19. Quiz Validation Set Size0:24
19. Quiz: Validation Set Size
20. Validation Set Size Continued0:24
21. Optimizing a Logistic Classifier0:27
22. Stochastic Gradient Descent2:26
23. Momentum and Learning Rate Decay1:30
24. Parameter Hyperspace!1:29
25. Quiz Mini batch
26. Epochs
27. Lab TensorFlow Neural Network
28. Understanding Jupyter Workspaces
29. Jupyter Workspace TensorFlow
Deep Neural Networks
01. Intro to Deep Neural Networks0:34
02. Quiz Number of Parameters0:16
02. Quiz: Number of Parameters
03. Linear Models are Limited1:26
04. Quiz Rectified Linear Units0:25
05. Network of ReLUs0:46
06. 2 Layer Neural Network
07. Quiz TensorFlow ReLUs
08. No Neurons0:28
09. The Chain Rule0:23
10. Backprop1:55
11. Deep Neural Network in TensorFlow
12. Training a Deep Learning Network1:15
13. Save and Restore TensorFlow Models
14. Finetuning
15. Regularization Intro0:56
16. Regularization0:59
17. Regularization Quiz0:24
18. Dropout1:43
19. Dropout Pt. 20:48
20. Quiz TensorFlow Dropout
21. Lab Tensorflow Deep Neural Network
22. Jupyter Workspace DNN
Convolutional Neural Networks
01. Intro To CNNs0:11
02. Color0:31
03. Statistical Invariance1:33
04. Convolutional Networks3:04
05. Intuition
06. Filters
07. Feature Map Sizes0:28
07. Feature Map Sizes 20:45
08. Convolutions continued0:37
09. Parameters
10. Quiz Convolution Output Shape
10. Quiz: Convolution Output Shape
11. Solution Convolution Output Shape
12. Quiz Number of Parameters
12. Quiz Number of Parameters
13. Solution Number of Parameters
14. Quiz Parameter Sharing
14. Quiz Parameter Sharing
15. Solution Parameter Sharing
16. Visualizing CNNs
17. TensorFlow Convolution Layer
18. Explore The Design Space2:16
19. TensorFlow Max Pooling
20. Pooling Intuition
21. Quiz Pooling Mechanics
21. Quiz: Pooling Mechanics
22. Solution Pooling Mechanics
23. Pooling Practice
25. 1x1 Convolutions1:10
26. Inception Module1:07
27. Convolutional Network in TensorFlow
28. TensorFlow Convolution Layer
29. Solution TensorFlow Convolution Layer
30. TensorFlow Pooling Layer
31. Solution TensorFlow Pooling Layer
32. Lab Tensorflow CNN
33. GPU Workspace Introduction
35. CNNs Additional Resources
36. CNNs Wrapup0:31
Fully Convolutional Networks
01. Intro0:46
02. Why Fully Convolutional Networks (FCNs)1:36
03. Fully Convolutional Networks1:01
04. Fully Connected to 1x1 Convolution0:53
04. Fully Connected to 1x1 Convolution
05. 1x1 Convolution Quiz
06. 1x1 Convolution Quiz Solution
07. Transposed Convolutions0:35
08. Transposed Convolution Quiz
09. Transposed Convolution Quiz Solution
10. Skip Connections1:02
11. FCNs In The Wild1:07
12. Outro0:22
Lab Semantic Segmentation
01. Intro0:18
02. Bounding Boxes0:53
03. Semantic Segmentation0:35
04. Scene Understanding0:35
05. Lab Semantic Segmentation
06. Lab Getting Started
07. Lab Keras00:00
08. Lab Encoder
09. Lab Batch Normalization
10. Lab Decoder
10. Lab: Decoder
11. Lab Layer Concatenation
12. IoU00:00
13. IoU Quiz
13. IoU Quiz
14. Outro00:00
15. Jupyter Workspace Semantic Segmentation
Project Follow Me
01. Project Intro1:20
02. Setting up your Local Environment
03. Working with the Simulator
04. Collecting your Data
05. Data Collection Guide1:18
06. Building your Segmentation Network
07. Training and Validation
08. GPU Workspace Introduction
09. Workspace Best Practices
10. Workspace Follow Me
11. AWS GPU Instance Preparation
12. AWS GPU Instance Set Up
13. Testing your Model in the Simulator
Project Rubric - Follow Me
Project Description - Follow Me
Submitting Your Project
Term 1 Outro
01. Outro00:00
02. Autonomous Systems Interview
Introduction to C++ for Robotics
01. Introducing Karim0:44
02. Welcome!1:18
03. Overview1:08
04. Transitioning1:18
05. Ubuntu Setup0:51
06. Editor Choice00:00
06. Editor Choice
07. Hello, World!00:00
08. Compile and Execute00:00
08. Compile and Execute
09. Functions and Data Structures00:00
09. Functions and Data Structures
10. Classes and Objects00:00
10. Classes and Objects
11. Inheritance and Pointers1:42
11. Inheritance and Pointers
12. Template Classes00:00
13. External Libraries00:00
13. External Libraries
14. ROS Nodes3:26
15. Rover Control4:32
15. Rover Control
16. Challenge!0:53
Introduction to Term 2
01. Term 2 Handoff0:55
02. Introduction1:20
03. Objectives2:39
04. Outline1:50
05. Class Schedule
The Jetson TX2
01. Introduction1:52
02. Jetson Overview2:45
03. Jetson Developer Kit Board
03. Jetson Developer Kit Board
04. Jetson Setup1:27
05. Host Setup
06. JetPack
07. SSH from Host
08. Recap0:19
Interacting with Robotics Hardware
01. Overview00:52
02. Battery2:20
02. Battery
03. GPIO2:33
03. GPIO
04. Breadboard1:55
05. Motors and Sensors
05. Motors and Sensors
06. Recap0:28
Lab Hardware Hello World
01. Overview0:49
02. Hardware List
03. LED Circuit4:06
04. Equivalent Resistance
04. Equivalent Resistance
05. Connect the LED Circuit
06. Transistor Switch Circuit00:00
06. Transistor Switch Circuit
07. Connect the Transistor Circuit
08. Software Control
09. Recap0:21
Robotics Sensor Options
01. Overview0:30
02. Cameras0:36
03. IMU00:37
04. RADAR00:00
05. LIDAR00:00
06. IR00:00
07. Variable Resistors00:00
08. Ultrasonic00:00
09. Encoders00:00
10. Recap00:00
Inference Development
01. Overview1:34
02. DIGITS MINST Example4:02
03. Lab Nvidia DIGITS
04. Inference on the Jetson0:32
05. Deploy the Model0:27
06. Lab Nvidia Deployment
07. Recap0:48
Inference Applications in Robotics
01. Overview1:04
02. Embedded Examples00:00
03. Metrics
03. Metrics
04. SpeedAccuracy Tradeoff
05. Tradeoff Quiz
05. Tradeoff Quiz
06. Recap00:00
Project Robotic Inference
01. Overview00:00
02. Practicing the DIGITS Workflow
03. Picking your Robotic Inference Idea14:40
04. Collecting your own Data
05. Importance of Documentation
06. Optional Deploying your Inference Project
07. DIGITS Workspace
08. Recap00:00
09. Common Questions
Project Rubric Robotic Inference
Project Description Robotic Inference
Submit your project
Introduction to Localization
01. Localization in Robotics2:02
02. Localization Challenges1:54
02. Localization Challenges
02. Localization Challenges Solution0:22
03. Overview00:00
Kalman Filters
01. Overview0:38
02. What's a Kalman Filter2:10
03. History1:11
04. Applications0:45
05. Variations0:51
06. Robot Uncertainty3:22
07. Kalman Filter Advantage1:27
08. 1D Gaussian
08.2 1D Gaussian
08.2 1D Gaussian
08.3 1D Gaussian
08.3 1D Gaussian
09. Designing 1D Kalman Filters2:20
10. Measurement Update0:48
10. Measurement Update - Quiz
10. Measurement Update - Quiz
10. Measurement Update 1D0:19
10. Measurement Update 1D
10.3 Measurement Update
11. State Prediction1:26
12. 1D Kalman Filter1:54
13. Multivariate Gaussian
13.2 Multivariate Gaussian3:04
14. Intro to Multidimensional KF3:37
15. Design of Multidimensional KF
15.2 Design of Multidimensional KF4:48
16. Introduction to EKF5:24
17. EKF
18. EKF Example
19. Recap0:26
Lab Kalman Filters
01. Introduction1:24
02. Sensor Fusion2:10
03. Catkin Workspace
05. TurtleBot Gazebo Package2:47
06. Robot Pose EKF Package3:04
07. Odometry to Trajectory Package1:28
08. TurtleBot Teleop Package1:32
09. Rviz Package1:52
10. Main Launch0:36
11. Rqt Multiplot2:20
12. Outro0:36
Monte Carlo Localization
01. Introduction0:47
02. What's MCL1:18
03. Power of MCL1:15
04. Particle Filters1:54
05. Bayes Filtering
06. MCL The Algorithm1:12
06. MCL: The Algorithm
07. MCL in Action1:08
07. MCL in Action
08. Outro0:24
Build MCL in C++
01. Introduction1:28
02. Robot Class1:12
02. Robot Class
03. First Interaction0:46
04. Motion and Sensing
05. Noise0:13
06. Particle Filter1:01
06.1 Particle Filter
06.2 Particle Filter
07. Importance Weight00:00
08. Resampling00:00
09. Resampling Wheel00:00
10. Error00:00
11. Graphing00:00
12. Workspace
13. Images00:00
14. Outro00:00
GraphSLAM
01. Introduction00:00
02. Graphs00:00
03. Constraints00:00
04. Front End vs Back End00:00
05. Maximum Likelihood Estimation
06. MLE Example
06. MLE Example
07. Numerical Solution to MLE
08. Mid Lesson Overview00:00
09. 1 D to n D
10. Information Matrix and Vector00:00
11. Inference
12. Nonlinear Constraints
13. Graph SLAM at a Glance00:00
14. Intro to 3D SLAM With RTAB Map00:00
15. 3D SLAM With RTAB Map00:00
16. Visual Bag of Words00:00
17. RTAB Map Memory Management00:00
18. RTAB Map Optimization and Output
19. Outro00:00
Project Where Am I
01. Overview
02. Gazebo Hello, world!
02. Gazebo: Hello, world!
03. Robot Model Basic Setup
03. Robot Model: Basic Setup
04. Let There Be Sight!
04. Let There Be Sight!
05. RViz Integration
06. Localization Map
07. Localization AMCL Package
08. Localization Parameter Tuning 1
09. Localization Parameter Tuning 2
10. Launching and Testing
11. Outro
12. Common Questions
13. Project Challenge00:00
14. Project Workspace
Project Rubric Where Am I
Project Description Where Am I
Submitting Your Project
Introduction to Mapping and SLAM
01. Introduction1:40
02. Mapping00:00
03. SLAM00:00
Occupancy Grid Mapping
01. Introduction00:00
02. Importance of Mapping00:00
02. Importance of Mapping
03. Challenges and Difficulties00:00
03. Challenges and Difficulties
04. Mapping with Known Poses00:00
04. Mapping with Known Poses
05. Posterior Probability
05. Posterior Probability
06. Grid Cells00:00
06. Grid Cells
07. Computing the Posterior
07. Computing the Posterior
08. Filtering00:00
08. Filtering
09. Binary Bayes Filter Algorithm
10. Occupancy Grid Mapping Algorithm00:00
11. Inverse Sensor Model00:00
12. Generate the Map
13. Workspace00:00
14. Multi Sensor Fusion
15. Introduction to 3D Mapping
16. 3D Data Representations00:00
17. Octomap00:00
18. Outro00:00
Grid-based FastSLAM
01. Introduction00:00
01. Introduction
02. Online SLAM
02. Online SLAM
03. Full SLAM00:00
03. Full SLAM
04. Nature of SLAM
04. Nature of SLAM
05. Correspondence00:00
05. Correspondence
06. SLAM Challenges
06. SLAM Challenges
07. Particle Filter Approach to SLAM00:00
08. Introduction to FastSLAM00:00
08. Introduction to FastSLAM
09. FastSLAM Instances
09. FastSLAM Instances
10. Adapting FastSLAM to Grid Maps
10. Adapting FastSLAM to Grid Maps
11. Grid based FastSLAM Techniques00:00
11. Grid-based FastSLAM Techniques
12. The Grid based FastSLAM Algorithm00:00
12. The Grid-based FastSLAM Algorithm
13. gmapping ROS Package00:00
14. Workspace
15. SLAM with ROS00:00
Project Map My World Robot
01. Project Introduction
02. Extending your Robot Creation Sensor Upgrade
03. Extending your Robot Creation Launch Files
04. Debugging in ROS Transform Frames
05. Debugging in ROS roswtf
06. Debugging in ROS rqt common plugins
07. RTAB Map Visualization Tools Database Viewer
08. RTAB Map Visualization Tools rtabmapviz
09. Final Considerations
10. Going Above and Beyond Localization
11. Going Above and Beyond Other RTAB Map Features
12. Ubuntu Install and Common Troubleshooting
13. Workspace
14. Common Questions
Project Rubric Map My World Robot
Project Description Map My World Robot
Submitting Your Project
Intro to Path Planning and Navigation
01. Lesson Overview00:00
02. Applications
Classic Path Planning
01. Introduction to Path Planning00:00
02. Examples of Path Planning00:00
02. Examples of Path Planning
03. Approaches to Path Planning
04. Discrete Planning00:00
05. Continuous Representation00:00
06. Minkowski Sum
07. Quiz: Minkowski Sum
07. Quiz: Minkowski Sum
08. Minkowski Sum C++
09. Translation and Rotation00:00
10. 3D Configuration Space
10. 3D Configuration Space
11. Discretization00:00
12. Roadmap
13. Visibility Graph
13. Visibility Graph
14. Voronoi Diagram
14. Voronoi Diagram
15. Cell Decomposition
16. Approximate Cell Decomposition
16. Approximate Cell Decomposition
17. Potential Field
18. Discretization Wrap-Up00:00
19. Graph Search00:00
20. Terminology
21. Breadth-First Search00:00
21. Breadth-First Search
21.2 Breadth-First Search00:00
21.2 Breadth-First Search
22. Depth-First Search00:00
22. Depth-First Search
22.2 Depth-First Search00:00
22.2 Depth-First Search
23. Uniform Cost Search00:00
23. Uniform Cost Search
23.2 Uniform Cost Search00:00
23.2 Uniform Cost Search
24. A* Search00:00
24. A* Search
25. Overall Concerns
26. Graph-Search Wrap-Up00:00
27. Discrete Planning Wrap-Up00:00
Lab Path Planning
01. Introduction
02. Modeling the Problem
03. BFS: Expansion List
04. BFS: Expansion Vector
05. BFS: Shortest Path
06. A*: Shortest Path
07. Comparison
08. A*: Real-World Map Practice
09. A*: Visualization
Sample-Based and Probabilistic Path Planning
01. Introduction to Sample-Based & Probabilistic Path Planning1:37
02. Why Sample-Based Planning
03. Weakening Requirements
04. Sample-Based Planning
05. Probabilistic Roadmap (PRM)00:00
05. Probabilistic Roadmap (PRM)
06. Rapidly Exploring Random Tree Method (RRT)3:20
06. Rapidly Exploring Random Tree Method (RRT)
07. Path Smoothing00:00
08. Overall Concerns
09. Sample-Based Planning Wrap-Up00:00
10. Introduction to Probabilistic Path Planning00:00
11. Markov Decision Process
12. Policies
12. Policies
13. State Utility
13. State Utility
15. Probabilistic Path Planning Wrap-Up00:00
Research in Navigation
01. Introduction
02. Navigation with Deep RL
03. A3C00:00
04. Actor-Critic Quiz
04. Actor-Critic Quiz
05. Challenges in RL Navigation
03.2 A3C00:00
Project: Home Service Robot
01. Introduction1:44
02. Working Environment
03. Workspace
04. Shell Scripts
05. Catkin Workspace
06. Building Editor2:18
07. Testing SLAM
08. Wall Follower0:28
09. Testing Navigation00:00
10. Reaching Multiple Goals00:00
11. Modeling Virtual Objects00:00
12. Putting it all Together1:00
Project Rubric - Home Service Robot
Project Description - Home Service Robot
Submitting Your Project
Project Details
01. Project Specification
02. Getting Started
03. Scoring Criteria
04. Path Planning
05. Project Workspace
06. Submission Instructions
07. Project Walkthrough
08. Hints
Submitting Your Project
Intro to RL for Robotics
01. Introduction2:01
02. Deep RL in Robotics2:03
02. Deep RL in Robotics
03. Lesson Roadmap1:51
RL Basics
01. Introduction1:32
02. Applications2:16
03. The Setting4:58
04. Reference Guide
05. The Setting, Revisited00:00
06. Episodic vs. Continuing Tasks00:00
07. Quiz: Test Your Intuition
07. Quiz: Test Your Intuition
08. Quiz: Episodic or Continuing?
08. Quiz: Episodic or Continuing?
09. The Reward Hypothesis00:00
10. Goals and Rewards, Part 100:00
11. Goals and Rewards, Part 200:00
12. Quiz: Goals and Rewards
13. Cumulative Reward00:00
14. Discounted Return00:00
15. Quiz: Pole-Balancing
16. MDPs, Part 100:00
17. MDPs, Part 200:00
18. Quiz: One-Step Dynamics, Part 1
18. Quiz: One-Step Dynamics, Part 1
19. Quiz: One-Step Dynamics, Part 2
19. Quiz: One-Step Dynamics, Part 2
20. MDPs, Part 300:00
21. Summary
22. Policies00:00
23. Quiz: Interpret the Policy
23. Quiz: Interpret the Policy
24. Gridworld Example00:00
25. State-Value Functions00:00
26. Bellman Equations00:00
27. Quiz: State-Value Functions
27. Quiz: State-Value Functions
28. Optimality00:00
29. Action-Value Functions00:00
30. Quiz: Action-Value Functions
30. Quiz: Action-Value Functions
31. Optimal Policies00:00
32. Quiz: Optimal Policies
32. Quiz: Optimal Policies
Q-Learning Lab
01. Introduction00:00
02. Q-Learning Algorithm00:00
02. Q-Learning Algorithm
03. Q-Learning Example
03. Q-Learning Example
04. OpenAI Gym
04. OpenAI Gym
05. Q-Learning Notebook
06. Recap00:00
Deep RL
01. Introduction00:00
02. From RL to Deep RL00:00
02. From RL to Deep RL
03. DQN Overview00:00
04. Deep Q Network00:00
05. Experience Replay00:00
06. Fixed Q Targets00:00
07. Recap00:00
DQN Lab
01. Introduction1:16
02. PyTorch Intro
02. PyTorch Intro
03. PyTorch Part 1
04. PyTorch Part 2
05. DQN Notebook
06. Recap00:00
Deep RL Manipulator
01. Introduction0:53
02. C/C++ API
02. C/C++ API
03. Catch Game Sample
03. Catch Game Sample
04. Fruit Game Sample
04. Fruit Game Sample
05. Test the API Workspace
06. Project Environment
06. Project Environment
07. Gazebo Arm Plugin
08. Introduction to LSTMs
09. Recap00:00
Project Deep RL Arm Manipulation
01. Overview
02. Getting Started
03. Tasks
04. Recap and Task List
05. Additional Project Challenges
06. Project Workspace
Project Rubric - Deep RL Arm Manipulation
Project Description - Deep RL Arm Manipulation
Submitting Your Project
Job Search
Intro1:22
Job Search Mindset1:27
Target Your Application to An Employer1:27
Open Yourself Up to Opportunity00:24
Refine Your Entry-Level Resume
Convey Your Skills Concisely00:00
Effective Resume Components00:00
Resume Structure00:00
Describe Your Work Experiences00:00
Resume Reflection00:00
Resume Review00:00
Assigment00:00
Craft Your Cover Letter
Get an Interview with a Cover Letter!1:39
Purpose of the Cover Letter00:00
Cover Letter Components0:54
Write the Introduction1:34
Write the Body2:07
Write the Conclusion0:27
Format1:10
Assignments00:00
Optimize Your GitHub Profile
Introduction0:52
GitHub profile important items1:35
Good GitHub repository1:11
Interview Part 12:11
Identify fixes for example “bad” profile0:13
Identify fixes for example “bad” profile 20:51
Quick Fixes #100:00
Quick Fixes #200:00
Writing READMEs00:00
Interview Part 200:00
Commit messages best practices
Reflect on your commit messages00:00
Participating in open source projects00:00
Interview Part 300:00
Participating in open source projects 200:00
Starting interesting repositories00:00
Assignments00:00
Develop Your Personal Brand
Why Network?00:00
Why Use Elevator Pitches?2:04
Personal Branding
Elevator Pitch1:08
Pitching to a Recruiter0:51
Why Use Elevator Pitches?1:41
Explore the Simulator

Unity Environment
We used the Unity game engine to build the simulated environment you’ll be navigating through in this project. Unity offers a free personal license and is largely open-source, making it a great option for a program like this. It works across Linux, OS X and Windows platforms.
You don’t need to know anything more about Unity to use the simulator, but if you want to learn more or get started building your own environments check out their website! The code we used to build the environment for this project is all open-source and you can check out the code in this repository.
Download and Launch the Simulator
The first step of the project is to download the simulator and familiarize yourself with how it works. Use the links below to get the simulator version that’s appropriate for your operating system.
MacOS Simulator Build
Linux Simulator Build
Windows Simulator Build
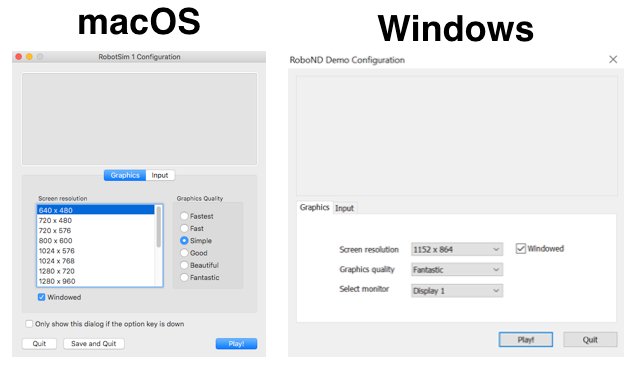
When you launch (double click on) the simulator you will have the option to set the resolution and graphics quality. You could choose lower resolution / quality for faster rendering. Be sure to check the box next to Windowed so the simulator doesn't take up the full screen. Click on the input tab to change the keyboard input definitions; this may be necessary if you are on a non-U.S. keyboard. The next time you launch, these settings will be restored. Click Play to launch the simulator!
Once you click Play you'll see a screen that looks like the one below. Choose Training Mode to be able to manually drive the rover around in the environment. You'll notice the app takes over your mouse immediately. You can use the Esc key to get your mouse back.

Manual Controls
Experiment in Training Mode with the various manual functions.
- Throttle, brake and steering:
wsadletters orarrow keys(can also steer with mouse) - Toggle mouse function between camera perspective and steering:
esckey - Change the viewing perspective:
tabkey or mouse - Change zoom on the viewing camera: mouse
scroll - Reset viewing camera zoom: middle mouse button (
MMB) - Activate the robot arm to pick up a sample: left mouse button (
LMB) orenterkey (only works whenis near objective = yes)
Have a look around and explore the environment!
Note: Unity vs. Gazebo
Later in this program you’ll be using the Gazebo simulation environment because of the powerful physics engine it offers and its seamless integration with the Robot Operating System or ROS, which you’ll learn about in the next lessons. Unity, however, offers much more photorealistic image quality than Gazebo, which can be a major advantage for computer vision applications. In this program we provide you with exposure to both Unity and Gazebo because both are powerful tools and each has its own unique advantages.
Simulation is a huge part of robotics development and several teams (including our own) are working to make the connection between ROS and Unity much more fluid. As such, going forward as a roboticist, you can expect to get even more exposure to working with game engines in simulation.